- This topic has 6 replies, 2 voices, and was last updated 7 years, 3 months ago by
Saphira.
-
AuthorPosts
-
-
September 16, 2018 at 1:46 am #15579
Nikki Schwartz
GuestI am having trouble when a mound is going to be poured with more than one color. I pour one color and even though I wait for the first one to set, I am having a hard time with the first color not leaking in to the area for the 2nd color. How do you contain a color in the designated area of the mold? I would appreciate any help.
Thank you,
Nikki -
September 16, 2018 at 3:00 pm #15585
Katherine Swift
KeymasterHi Nikki, I’m having a hard time visualizing what you are trying to do. Can you link to a picture?
-
September 18, 2018 at 10:21 pm #15624
Katherine Swift
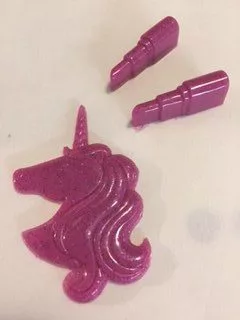
KeymasterPhoto and response from Nikki:
Hopefully this photo will help me explain:
1. For instance on the lipstick molds. I want to make the point of the lipstick in red and make the case of the lipstick black.
2. Another example is on the Unicorn. I want to color the “horn” a different color than the rest of the unicorn.
What I find happens is that even though I am pouring my resin into the horn area of the mold first, it flows into the area of the unicorn.
With the lipstick, when I pour my resin or even apply it with a toothpick, to the tube, the resin will seep or flow into the tip of the lipstick.
It is not just these two molds, it is with many molds that I would like to know how to keep this from happening.I hope I have been able to explain my question a little better?
-
September 18, 2018 at 10:24 pm #15626
Katherine Swift
KeymasterHI Nikki,
Thanks for the picture. Yes, this helps a lot.
I’m afraid I don’t have many good options for you.
Option 1: Cast the entire piece in a light beige or white color. Paint with acrylic paints after demolding.
Option 2: Use melted wax in strategic places to create a dam. Cast your resin, then remove the wax before making the new pour.
Option 3: Try ‘painting’ the areas of the mold with a quick-curing resin. You wouldn’t have to fill the mold, but as long as the resin sticks to the sides, it could start curing quickly enough that it wouldn’t run down into your mold. You could then fill the mold with a neutral color to fill in the rest of the mold once the first layer has cured.Any of these sound like something you want to try?
-
-
-
September 17, 2018 at 2:14 am #15588
Nikki Schwartz
GuestKatherine, I am trying to send you a photo of what I’m talking about and I can’t figure out how to copy the photo and send it to you.
HElp and thanks,
Nikki-
September 17, 2018 at 10:46 pm #15600
Katherine Swift
KeymasterHi Nikki,
Send it to info [at] resinobsession {dot} com and mention this post.
-
-
September 28, 2018 at 5:29 pm #15809
Saphira
GuestI have an idea for keeping resin colors completely separate. For your lipstick mold, place silly putty or Alumilite clay or wax into the mold where the red should be. Either make a thick wall where the red should start, or fill up the area where the red will be. Then pour black resin and watch it stop where the red will eventually go. Let that dry/set. Then scrape out all the putty/clay/wax completely and fill that space with red resin.
The idea is to use putty/clay/wax to block a certain color of resin from entering the mold where it shouldn’t be. Once the resin cures, remove the putty and fill with the next color. No blending at all.
-
-
AuthorPosts
- The topic ‘Using more than one color in a mold.’ is closed to new replies.


