Hello, Crafty Patriots! Ready to combine your love for DIY projects and patriotic pride into one epic craft? Today, we’re upping our game using resin lacing—a technique that’ll have your creations looking as spectacular as a Fourth of July fireworks display. Grab your red, white, and blue supplies, because we’re about to get star-spangled crafty!
What is Resin Lacing?
Resin lacing is the art of creating delicate, cell designs within your resin using contrasting colors and a little bit of magic. Check out our article here about how to create resin lacing art.
Materials Needed
- Alumilite Amazing Clear Cast Resin
- Wood Cutting Board
- Mixing cups and stirring sticks
- Acrylic Pouring Oil
- Acrylic paint in white, red, and blue
- Painting Tape
- White Star Stickers
- Gloves and safety goggles for protection
1. Prepare Your Workspace
First things first, let’s set up a crafting space worthy of a patriotic project. Lay down some protective sheets (plastic or newspaper) to catch any resin spills and suit up with gloves and goggles. Crank up your favorite patriotic playlist to get into the spirit!
2. Prepare the Cutting Board
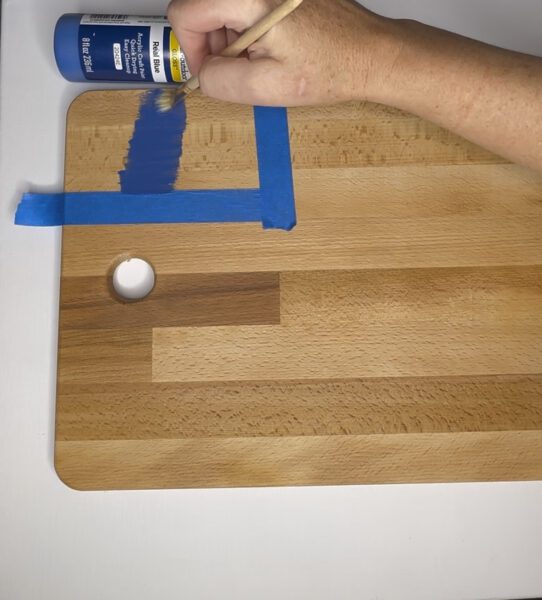
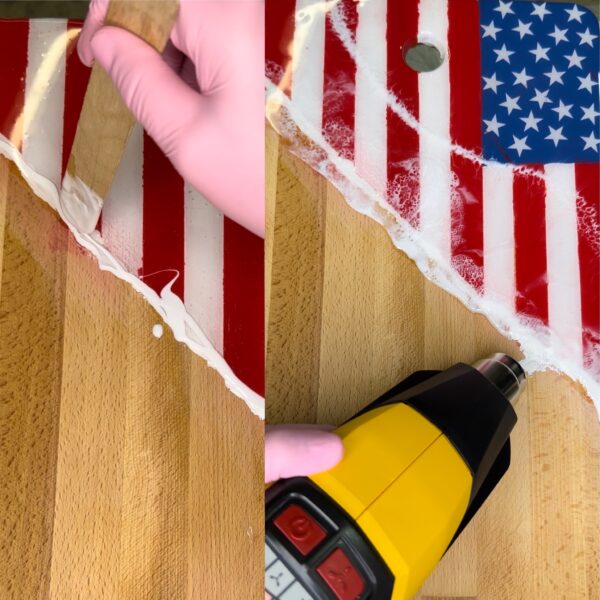
Start with taping off a rectangle in the upper left area of your cutting board. This will be the union of the flag. Paint the area with a blue acrylic paint. Once the paint is dry, peel the tape to reveal the perfect rectangle.
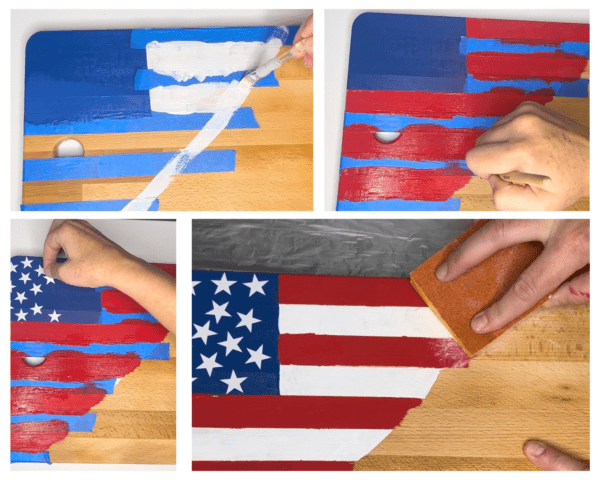
Time to make the strips. Using the tape again mark your stripes on your cutting board. Paint the stripes in a diagonal direction to create that “ripped” effect. Once the blue is dry, place your star stickers in any order over the blue rectangle. If you want your flag to have a worn look use a sanding block to rough up the paint along the edges.
3. Measure and Mix the Resin for Lacing
Measure the Amazing Clear Cast and hardener at a 1:1 ratio. Mix the resin and hardener thoroughly in a mixing cup, scraping the sides and bottom to ensure a complete mix.
4. Pour the Resin
Separate a small amount of resin into a separate mixing cup. Add Alumilite White Dye to that portion and some drops of Acrylic pouring oil. *This is the secret addition to getting perfect cell separation! *
Using the clear resin, pour it over the side with your stripes and stars. Make sure every part of the painted flag is covered.
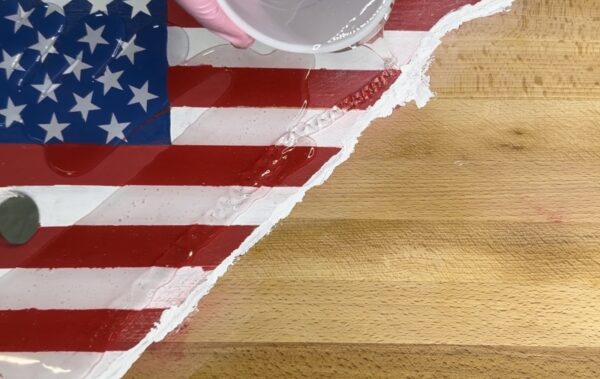
5. Create the Resin Lacing Effect
Pour a line of mixed white resin along the edge of your stripes and a few lines over the other stripes. Using your heat gun blow the white lines into a wave. You can see the cells already forming before I even hit it with a heat gun and that’s because of the acrylic oil.
6. Allow to Cure
Let the resin sit undisturbed in a warm, dust-free environment. Avoid moving your project during the curing process to prevent spills or flaws in the final piece.
Once the resin is fully cured it’s ready to use!
Additional Option* Add some cutting board oil to the area’s not covered in resin! This will give it that finishing touch!
Tips for Success with Resin Lacing
- Choose the Right Resin and Additives:
- Use the right colorant for successful lacing. We recommend a dye or an ocean pigment.
- Work on a Level Surface:
- Ensure your work surface is perfectly level to prevent the resin from pooling or unevenly spreading. Use a level tool to check your workspace before pouring.
- Prepare your workspace with proper protection, like a silicone mat or plastic sheet, to catch any drips and make cleanup easier.
- Master the Technique:
- Use tools like heat guns or torches to gently warm the resin, which helps in creating and enhancing the lace effect. Be cautious not to overheat, as this can cause bubbles or uneven curing.