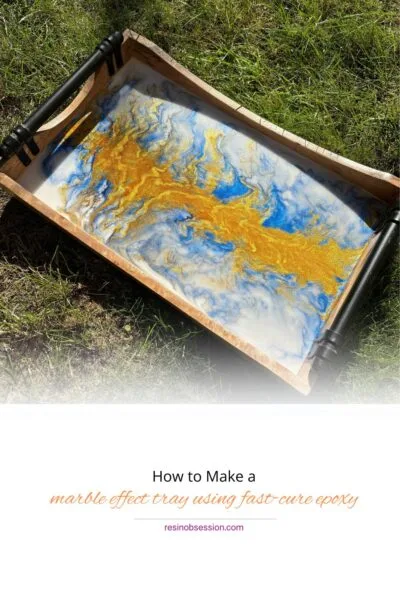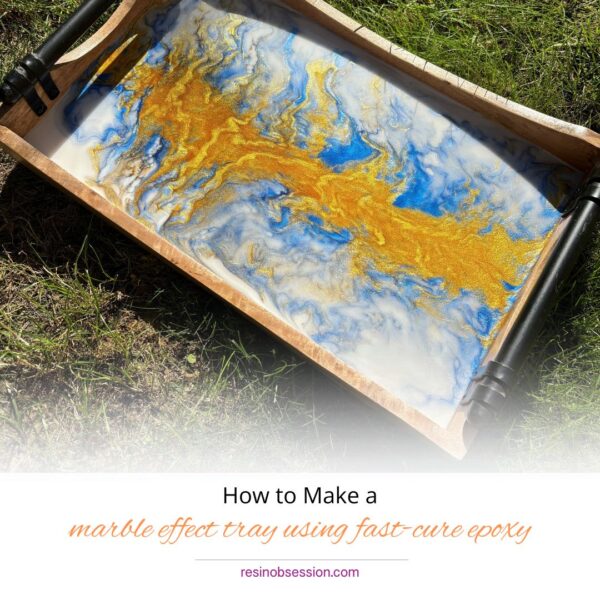
Ever wanted to add a pop of luxury to your home without having to invest in real marble? I’ve got you covered (literally) with a fun, artsy project: a DIY marble effect tray using fast-cure epoxy! Grab your gloves and creativity, because we’re about to create something swanky and totally Instagram-worthy.
Why Fast-Cure Epoxy?
Life moves fast—and so does fast-cure epoxy. Waiting 72 hours for resin to cure? No thanks! With this magical stuff, you’ll have your masterpiece set in a matter of hours. Plus, fast-cure epoxy reduces the chances of pesky dust landing in your art (goodbye, sneaky fuzz particles). However, this also means less wiggle room—you gotta work quick, so put on some upbeat music and let’s get groovin’!
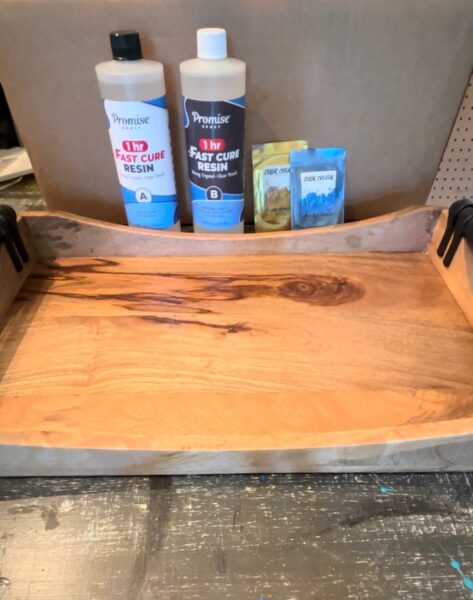
Supplies You’ll Need:
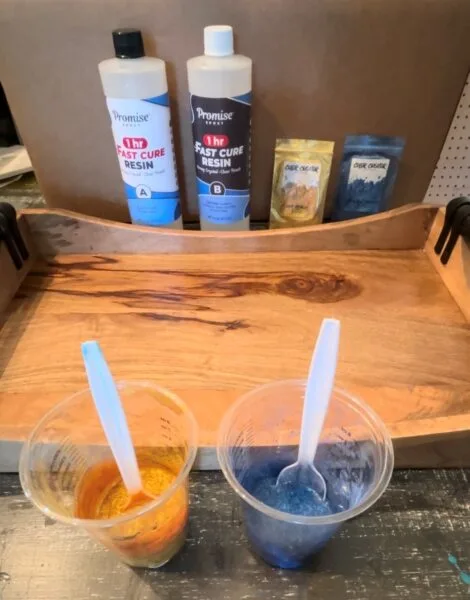
- Fast-cure epoxy resin (2-part system)
- Mixing cups and stir sticks
- Mica Powders and Dyes
- A board (wood, MDF, or even an old tray—get creative!)
- Heat gun or torch (to pop bubbles)
- Gloves and a drop cloth (because things will get messy)
Let’s Get Marbly!
Step 1: Prep That Board
Give your board a little love—lightly sand it, dust it off, and tape off any edges you want to keep clean. This step keeps your board looking pro, not like a craft explosion.
Pro-tip: If you’re doing this indoors, make sure you have proper ventilation. Fast-cure epoxy fumes aren’t exactly aromatherapy. 😉
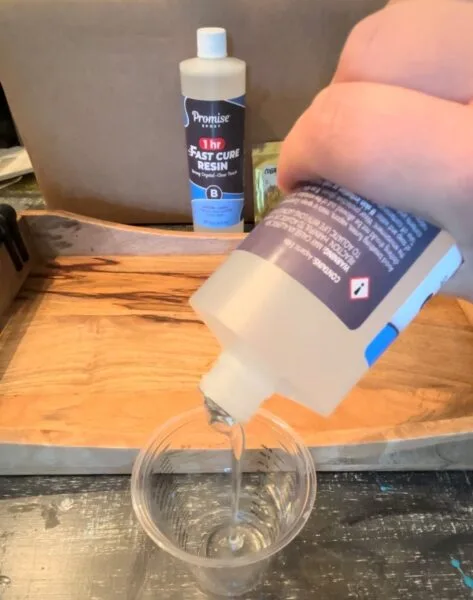
Step 2: Mix the Fast-Cure Epoxy
Follow the instructions on your epoxy kit—measure your resin and hardener precisely! Fast-cure epoxy gives you about 10-20 minutes of working time, so no dilly-dallying. Mix the two parts thoroughly but slowly to avoid bubbles.
Now for the fun part: COLOR!
Step 3: Divide and Conquer (Your Colors)
Pour some of the mixed epoxy into smaller cups and add your choice of dyes and/or mica powders. You’ll want:
- White for the marble base
- Gray and black for veins and shadows
- Gold or silver for a touch of glam (optional, but c’mon… why not?)
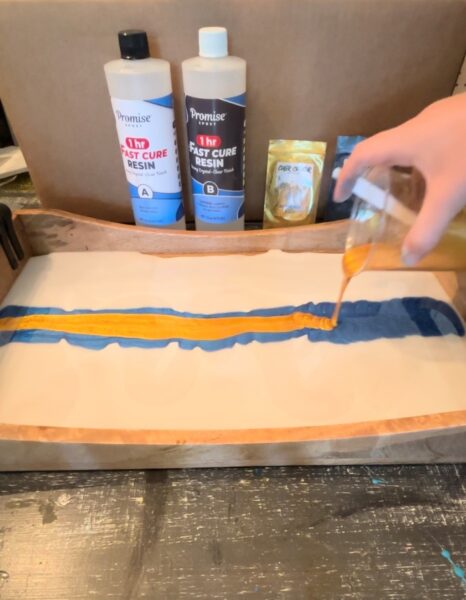
Step 4: Pour your Fast Cure-Epoxy
Start by pouring the white epoxy over your board, spreading it evenly. This will act as your “marble” base. Now it’s time to drizzle your colors in random streaks across the surface.
Grab your stirring stick or plastic spreader and gently swirl the colors together in wavy, natural-looking patterns. Don’t overdo it—marble has organic, flowing veins. Channel your inner Michelangelo and embrace imperfection!
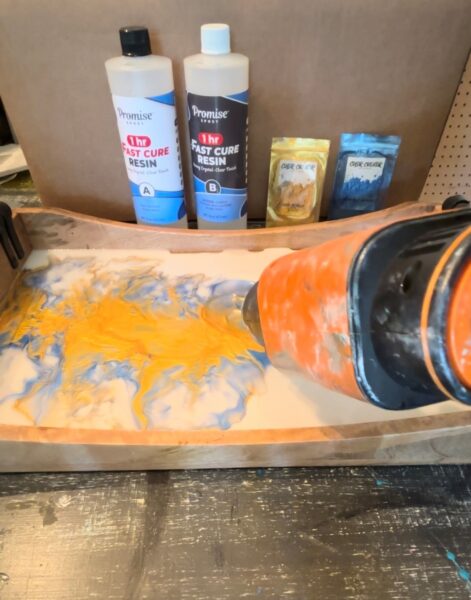
Step 5: Heat it Up
Use a heat gun or torch to gently wave over the surface. This does two things:
- Pops those annoying bubbles (buh-bye!)
- Helps the colors blend naturally into dreamy, fluid patterns.
This step is oddly satisfying, so enjoy it. Just be careful not to overheat, or you’ll create uneven textures or burn your epoxy (and nobody wants burnt marble).
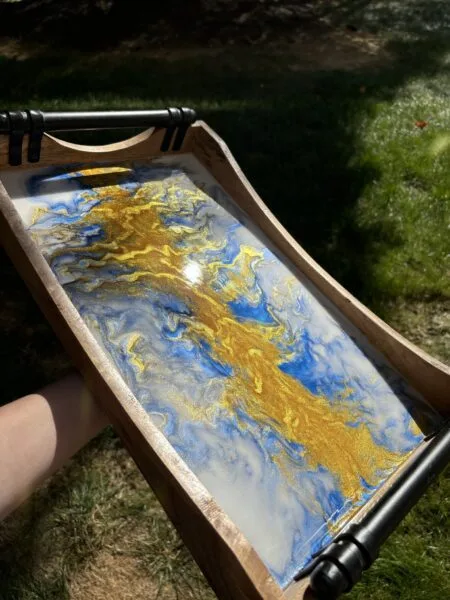
Step 6: Wait… But Not for Long!
Since you’re using fast-cure epoxy, your board should be dry to the touch in just a few hours! (Talk about instant gratification.)
If you want a high-gloss finish, you can pour a second clear coat of epoxy over the top. But even without it, your board will be smooth, shiny, and oh-so-marble-icious!
What Can You Do with Your New Fast-Cure Epoxy Marble Board?
- Serve cheese and wine like the chic host you are. 🧀🍷
- Use it as a vanity tray for perfumes and jewelry.
- Hang it as wall art to confuse guests into thinking you’ve splurged on custom marble.
- Or, just admire it every time you walk by. (Honestly, same.)
Tips and Troubleshooting for Fast-Cure Epoxy:
- Got bubbles? Heat gun to the rescue!
- Too much color blending? Stop swirling earlier next time—marble is more subtle than tie-dye.
- Epoxy dripping off the sides? Let it harden, then sand the edges smooth and clean.
Final Thoughts
Creating a marble effect board with fast-cure epoxy is so much fun. It’s like alchemy—you pour some liquids, do a little dance with colors, and suddenly you’ve got a luxurious piece of “marble” art without lifting a single slab.
So grab your supplies and let the swirling, tilting, and torching begin. Your inner artist—and your coffee table—will thank you!