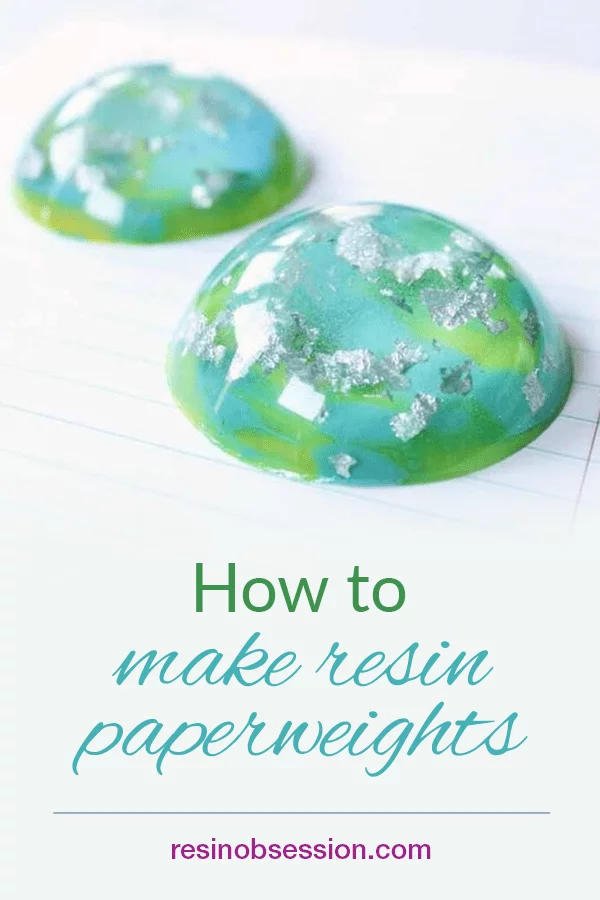
Ready to learn how to make a resin paperweight? You can make up a bunch and keep them on hand for occasions throughout the year. From birthdays to holidays, this resin paperweight project makes a great gift and is a beautiful way to show someone you care.
Spray the paperweight mold with the mold release spray. Then, allow it to dry completely.
This sphere mold makes a great paperweight mold because you can split the mold apart and only use one half at a time.
Step 2: Mix clear epoxy
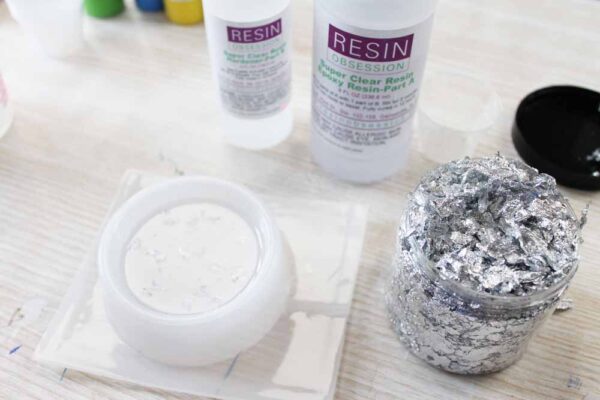
Mix enough super clear resin to almost fill your mold. The super clear resin is the perfect crafting resin for this making this paperweight because it cures hard and durable. Plus, it releases bubbles easily. For this mold, it took about two ounces of mixed resin. Then, add to the mold.
By the way, this article explains the easy ways to know how much resin you need, including a quick trick to knowing how much resin to put in the paperweight mold.
Step 3: Add metal leaf
Sprinkle in some of the gilding flakes. Crush some with your fingers to make small pieces. Use your stir stick to press them down into the paperweight. You will need to babysit this for a while until the resin starts to set up because the gilding flakes will float and drift. Occasionally check on them and readjust.
Set the entire thing aside and allow it to cure completely.
Step 4: Add colors
Mix more resin and add colorants. I used three opaque colors per paperweight, but you can use as few or as many colors as you like.
Add these colors randomly to the paperweight mold.
Use a stir stick to slightly mix and marble the resin colors, and make sure the entire surface is covered.
Step 5: Finish
Allow to completely cure, then remove from the mold.
Ready to try resin but want more help getting started?
Then you’ll want to get the ebook Resin Fundamentals. The instantly downloadable ebook shares the essential details beginners need to know to make something beautiful with resin. It’s the book I wish I had when I started with epoxy resin. Buy the PDF book now and download a copy in a few minutes.
10 thoughts on “A 5-Step Guide Of How To Make A Resin Paperweight”
Beautiful paperweights Katherine! Nobody I know uses them, they all have smartphones or laptops. However, this gave me an idea for jewelry using the cabochon molds I bought from you.
Your paper weights are beautiful. I love the colors. What a neat idea and I know I would use a few. I do alot outside on the deck. And the papers fly. Yes I’m interested. Thank you.


Beautiful paperweights Katherine! Nobody I know uses them, they all have smartphones or laptops. However, this gave me an idea for jewelry using the cabochon molds I bought from you.
Bonjour à vous,
Existe t’il des moules pour résine époxy 50cm/50cm?
Pour pouvoir faire des tableaux
Merci à vous Claire Nizet
Hello, how are you
My name is Renato, you deliver in Brazil.
What is the precise price of wood resin?
I need flower dyes ok I await reply thanks
Hi Renato, we do not ship to Brazil.
Those are beautiful! My middle son has just begun experimenting with using resin and I’ve begun looking for fun new ways to use it. Pinned.
Your paper weights are beautiful. I love the colors. What a neat idea and I know I would use a few. I do alot outside on the deck. And the papers fly. Yes I’m interested. Thank you.
They are lovely pieces. I’m hoping to start small and then add. Small paperweights? Who knows? Time will tell. Thank you for color ideas.
Could a photo be place on the bottom or in it?
Yes, that’s a great idea!
Great work i like it